What is Http injector? In simple a sentence, Http injector is a tool that is used to access blocked websites behind firewall with SSH tunneling/Proxy server support. As you guys all know, the aim of this post is how to get free internet on your ISP(Internet service Provider) for free. Http injector is more popular among the Asian countries but to me i prefer it to Psiphon and those other VPNs because one can use it to prevent his/her ISP from blocking their settings.
How to get Started:
1. First click here to download http injector
2. You would need to create an account from either mytunneling.com, tcpvpn.com. skyssh.com etc but for the purpose of this post i would be using skyssh.com.
3. First click here to visit skyssh, when you are on the site, you would see a list of different servers all from different countries so kindly choose one among them.
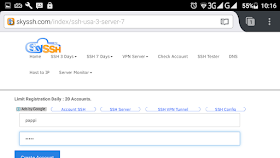
4. Click on create account and you would be taken to another page where you would see be ask to provide a username and password as see in the screenshots below. (i usually advice people to choose something very simple as a user name and password)

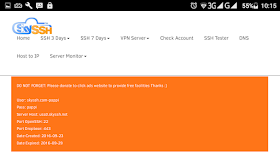
5. After providing your username and password, your account would be created and your login details would appear in as seen below. Now write down all the piece of information as you see them. Please also note that sometimes your account wont be created once it reaches the daily limit for a server, so in this case your are advised to go select another server and create an account.

6. Head back to your http injector app and configure it with your settings and login details. Click on the icon at the top right corner of the http injector app and then select "clear setting/Data".
7. Next click on the icon at the top left corner of the http injector app, click on"payload generator" and the payload generator tab would open for you to configure it as seen in the screenshot below.
SSH Port: This port is usually 22
SSH Username: Input your username here, mine was skyssh.com-pappi
SSH Password: mine was pappi
If you are still finding it hard then simply watch this video below to get a little insight
Note: This post is meant for educational purpose only.
How to get Started:
1. First click here to download http injector
2. You would need to create an account from either mytunneling.com, tcpvpn.com. skyssh.com etc but for the purpose of this post i would be using skyssh.com.
3. First click here to visit skyssh, when you are on the site, you would see a list of different servers all from different countries so kindly choose one among them.
4. Click on create account and you would be taken to another page where you would see be ask to provide a username and password as see in the screenshots below. (i usually advice people to choose something very simple as a user name and password)

5. After providing your username and password, your account would be created and your login details would appear in as seen below. Now write down all the piece of information as you see them. Please also note that sometimes your account wont be created once it reaches the daily limit for a server, so in this case your are advised to go select another server and create an account.

6. Head back to your http injector app and configure it with your settings and login details. Click on the icon at the top right corner of the http injector app and then select "clear setting/Data".
7. Next click on the icon at the top left corner of the http injector app, click on"payload generator" and the payload generator tab would open for you to configure it as seen in the screenshot below.
- Payload: Select normal
- Url/Host: This spot is usually provided for your free host or free page
- Request Method: Connect
- Injection method: You can choose if you want your injection to be either normal, front inject or back inject.
- Query Method: You can choose whether its front or back query method that you would need because this part also strengthens your injection.
- Extra Header: I always select online host and forward host but when the connection is experiencing constant disconnection, i do reverse the header and apply similar settings as i explained in my part 2 tutorial on how to browse for free using the the reverse method (click here to read the tutorials)
- Extra: I have used these ones before and i don't bother touching it.
- Now when you are done inputting your settings, click on generate and you would see something like the the screenshot below.
- Now don't bother touching the payload part because the previous settings that you inputted have been generated
- Next part is the remote Proxy. The remote proxy could be another free host or the ip in your access point settings. But when any of these doesn't work, you would have to apply a working proxy server that can establish connection to the web on you network. I made a post on how to get a free working proxy server that would give you free internet access on any network in the world (click here to visit post).
- When you click on start after inputting your remote proxy, you would be taken to a page where you would input your login details that you registered on any of those SSH sites. This is how it is:
SSH Port: This port is usually 22
SSH Username: Input your username here, mine was skyssh.com-pappi
SSH Password: mine was pappi
- Now enjoy your free internet access.
If you are still finding it hard then simply watch this video below to get a little insight
Note: This post is meant for educational purpose only.


This comment has been removed by the author.
ReplyDeleteThis comment has been removed by the author.
ReplyDelete